databasedev.co.uk - database solutions and downloads for microsoft access
Microsoft Access Articles
- General Microsoft Access Articles
- Microsoft Access 2007 Articles
- Tables
- Queries
- SQL
- Forms
- Reports
- Macros
- Modules & VBA
- Data Models
- Downloads
GUI Design
Resources
Online Shop
Info
Microsoft Access Macros
Require Data Entry with a Microsoft Access Macro:
If you are using a Microsoft Access database application for data entry you will want to ensure the quality of the data that is being entered. Validating data in Microsoft Access allows you to check data whilst it is being entered into the database, and there are various ways of performing these actions.
You don't want to be trying to ship an order to a company that does not have address details associated with it. If you don't have a contact name associated either, you can't even call to find the data. Creating a Microsoft Access macro to require data entry into certain fields will prompt the database user to complete this vital information. This will in turn deem your data to be more accurate and useful to all database users.
Macro Conditions
A macro condition is an expression that enables a macro to perform certain tasks only if a specific situation exists. A condition can check the value of a field, or compare the value in the field to another value. When you use a condition, the macro will follow one of two paths, depending on whether the condition is true or false.
For example, you may want to perform certain tasks in the database only when a specified condition it true; you might want the macro to check and see if a field in your database form contained a value, if not, the macro will execute a command to prevent you from saving the record.
Validating Data with Microsoft Access Macros
Instead of attaching the macro to a specific control object on the form (text box, command button, etc.), you attach the macro to the form itself. This way, it does not matter where the user adding the record moves the focus to, the macro will always run.
Common Microsoft Access Event Properties
The most common event properties to trigger data validation are shown in the table below. This shows when a macro will execute if attached to this event:
| Event | Event Property | The Macro Will Execute |
|---|---|---|
| Record data has changed. | Before Update | Before the entered data has been updated |
| Changed record data is saved. | After Update | After the entered data has been updated |
| A new record is inserted. | Before Insert | After you type into a new record |
| A record is deleted. | On Delete | In response to a deletion request, but before the record has been deleted |
When you validate data entry, the macro will likely contain the following macro actions:
| Action | Use this Action to: |
|---|---|
| Cancel Event | Prevent the user from posting a new record unless certain conditions are met. |
| Go To Control | Specify where on the form the insertion point is placed. |
| MsgBox | Display a custom message box to inform the user of any problems/solutions. |
Planning the Macro
Before actually creating any macros, you should plan what you will want the macro to do, and what actions you expect it to perform. When planning, ask yourself the following:
- What action performed by the user will trigger the macro?
- What is the first thing that the macro will do? The second?
- Which control will trigger the macro?
- Which event will trigger the macro?
- When will you want the macro to run?
The following example flow chart illustrates the plan for a macro. Drawing up a flow chart will help make your plan clear and easy to follow:
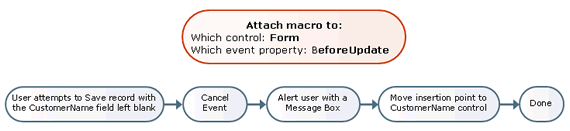
A flow chart plan for the macro
How to Require Data Entry with a Macro
- On your desired form, in the Before Update property box, open the Macro builder.
- Open the Condition column.
- Create an Is Null condition for the appropriate form field.
- Enter a CancelEvent action.
- In the Action column, choose MsgBox.
- In the Action Arguments pane, add your message text, select a msgbox type and enter the Title.
- Enter the GoToControl action, to move the insertion point back to the control that requires data.
- Save the macro.
Creating a Macro to Require Data Entry in a Microsoft Access Form Field
After we have planned the macro, we can then go ahead and build it. In this example, we will build a macro that will not allow a record to be saved unless it contains data in the CustomerName field on our database form. If we don't enter data into the field, when we attempt to make the save, we will return the insertion point back to the field.
Below, you will see the Customer Details form, containing the CustomerName field. This is the field that we are going to validate with our macro.
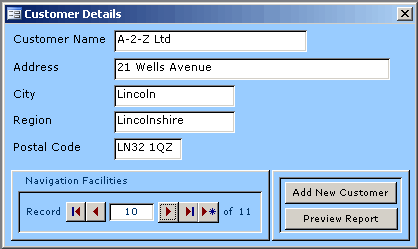
The Customer Details form, with the CustomerName field that we are
going to validate with our macro
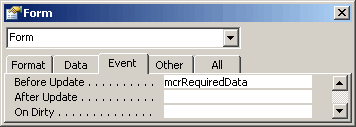
We need to go into the properties of the form, and view the Event tab of the property sheet, as shown below:
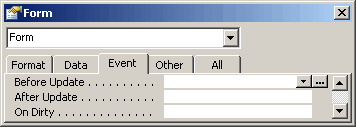
The Form properties, showing the BeforeUpdate event of the form
With the Before Update event of the form selected, we click on the Build button (...) and choose the Macro Builder:
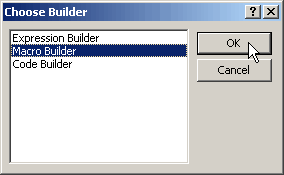
The Builder window, where we will choose the Macro Builder option
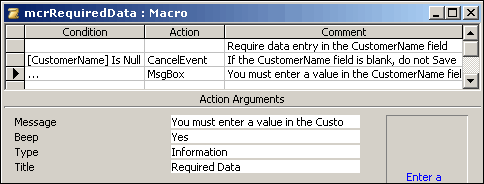
We enter a name for the macro in the Save As dialog box, in this case mcrRequiredData, and click OK. We then begin to build the macro by entering the conditions and actions required.
To create the macro, we perform the following steps:
- In the macro design view, we need to display the Condition column
if not already visible. We can either click on the Conditions button
 or choose Conditions from the View menu. In the first row of the
Comment column, we will enter the comment of "Require data
entry in the CustomerName field"
or choose Conditions from the View menu. In the first row of the
Comment column, we will enter the comment of "Require data
entry in the CustomerName field" - In the second row of the Condition column we enter the expression
of: [CustomerName] Is Null. In
the second row of the Action column, select the CancelEvent from
the drop down-list of actions. In the Comment column, enter "If
the CustomerName field is left blank, do not Save the record"

- In the third row of the macro condition column, we enter an ellipsis
(...), this allows us to attach multiple actions to the one condition.
In the Action column, select MsgBox from the drop-down
list. In the Action Arguments pane, in the message box, enter "You
must enter a value in the Customer Name field."
In the Type field, select the Information type message box from the drop-down list, and enter "Required Data" in the Title field.
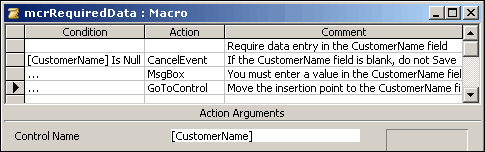
This will now provide information to the user as to why the record will not be saved if the Customer Name field is left blank, and will inform them that this is required data. - Finally, we will add the GoToControl action,
that will return the insertion point back to the control that requires
data.
In the fourth row of the Condition column, add another ellipsis (...) and add the GoToControl action from the drop-down list in the Action column.
In the Action Arguments pane, in the Control Name text box, type in [CustomerName]. Add the comment, "Move the insertion point back to the CustomerName field."
Save the macro, which should look like the example below, and close the macro window:
- The macro is attached to the Before Update event property of the
form, as shown below:
- We can now test the macro, by attempting to save a record that
contains missing data in the CustomerName field. When we try to
save the record, we will receive the following warning, the save
is cancelled, and focus is set back to the Customer Name field:
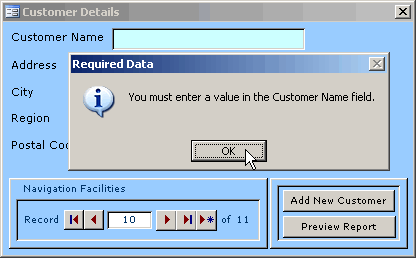
To save the record, you must enter the required data.
Images added to article courtesy of databasedev.co.uk